Have you ever wondered how to leverage AI to track your expenses effortlessly? Join me, Abbaoui Achraf, ML Engineer passionate about AI applications, as we build an AI-powered expense tracking application using cutting-edge tools like DeepSeek, Gradio, Pydantic, Pydantic-AI, and Supabase. Together, we’ll create a smart system that not only helps users manage their expenses but also provides intelligent insights about their spending patterns—all while keeping their data secure in a Supabase database.
Why Supabase?
Supabase provides a seamless backend-as-a-service solution, offering real-time PostgreSQL databases, authentication, and more. It’s an excellent choice for this project because it allows us to focus on the application logic and the AI agent rather than worrying about setting up and managing our own database.
Let’s get started!
1. Setting Up the Environment
First, install the required libraries to set up the project. Open a terminal and run:
pip install gradio pydantic pydantic-ai supabase logfire
Once the libraries are installed, we can start configuring the environment.
2. Configuring Logging
Before diving into the main app, it’s good practice to set up logging to track any issues or operations. This helps with debugging and maintaining the application.
import logfire
logfire.configure()
3. Defining Data Models with Pydantic
We need to define the data models that represent the structure of the expenses. These models ensure that we maintain consistent and valid data throughout the app.
Defining Expense Categories
We define the different categories of expenses, such as food, transport, etc.
from enum import Enum

class ExpenseCategory(str, Enum):
    FOOD = "food"
    TRANSPORT = "transport"
    ENTERTAINMENT = "entertainment"
    UTILITIES = "utilities"
    RENT = "rent"
    OTHER = "other"
Creating the Expense Base Model
This is the model that represents a single expense entry:
from pydantic import BaseModel, Field
from datetime import date
from uuid import UUID

class ExpenseBase(BaseModel):
    uuid: UUID = Field(description='Unique ID to be generated when creating an expense')
    title: str = Field(..., max_length=100)
    date: date
    description: str = Field(..., max_length=500)
    category: ExpenseCategory
    amount: float = Field(..., gt=0)
Creating Result Answer Model
This model will structure the response from the AI agent, including the user’s tips and the list of expenses:
from typing import List, Tuple, Union

class ResultAnswer(BaseModel):
    answer_to_user: str = Field(description='The answer that should be returned to the user, the answer should be good direct and in a friendly tone.')
    expense: Union[List[ExpenseBase] | None]
    tips_to_user: Tuple[bool, Union[str, None]]
4. Integrating Pydantic-AI
Now that we’ve defined our data models, we can create our AI agent using Pydantic-AI. This agent will be responsible for interpreting user queries, providing responses, and interacting with the Supabase database.
from pydantic_ai import Agent, RunContext
from pydantic_ai.models.openai import OpenAIModel
from pydantic_ai.usage import UsageLimits
from supabase import Client
from uuid import UUID

@dataclass
class Dependencies:
    user_uuid: UUID # For this Demo we will not use it
    supabase: Client | None

expense_agent = Agent(
    model=OpenAIModel(
        'deepseek-chat',  # Use your model name here
        base_url='<https://api.deepseek.com/v1>',
        api_key='your_api_key',  # Replace with your actual API key
    ),
    deps_type=Dependencies,
    result_type=ResultAnswer,
    system_prompt=(
        'You are an AI agent specialized in expense tracking, tasked with helping users manage their personal finances effectively. '
        'Your functionalities should include recording expenses, generating reports, sending budget alerts, and providing insights based on spending patterns.'
    ),
    model_settings={'temperature': 0.0} # The higher the temperature the diverse the model answers can be
)
5. Working with Supabase
Supabase is an open-source alternative to Firebase and provides a full set of backend services such as authentication, storage, and a powerful PostgreSQL database. For this project, we will primarily use Supabase’s PostgreSQL database to store, retrieve, and update user expenses.
1. Setting Up Supabase Client
To interact with Supabase, you need to initialize the Supabase client in your app. This will allow us to make queries to the database, such as adding or retrieving expenses.
from supabase import create_client, Client

url = '<https://xyz.supabase.co>'  # Replace with your Supabase URL
key = 'public-anon-key'  # Replace with your Supabase API key

supabase: Client = create_client(url, key)
2. Creating the Supabase Table for Expenses
Before adding or retrieving data from Supabase, ensure that you have created a table to store the expenses. Here’s an example SQL query to create the expenses table:
CREATE TABLE expenses (
    uuid UUID PRIMARY KEY,
    title TEXT NOT NULL,
    date DATE NOT NULL,
    description TEXT,
    category TEXT NOT NULL,
    amount FLOAT NOT NULL
);
You can run this SQL query in the Supabase Dashboard under the “SQL Editor” tab.
6. Implementing Database Interaction Functions
Adding Expenses to Supabase
We’ll implement a function that will insert expense data into the Supabase database:
@expense_agent.tool
async def add_to_database(ctx: RunContext[Dependencies], expenses: List[ExpenseBase]) -> str:
    """
    Add expenses to the database.
    """
    try:
        supabase: Client = ctx.deps.supabase_client
        user_uuid: str = ctx.deps.user_uuid

        rows_to_insert = []
        for expense in expenses:
            rows_to_insert.append({
                "user_uuid": user_uuid,
                "title": expense.title,
                "date": expense.date.isoformat(),
                "description": expense.description,
                "category": expense.category.value,
                "amount": expense.amount,
            })

        response = supabase.table("expenses").insert(rows_to_insert).execute()

        return f"Your Expenses have been saved. Inserted: {json.dumps(response.data, indent=2)}"
    except Exception as e:
        return f"Failed to add expenses to database. Error: {e}"
This function converts the expense into a dictionary, ensuring the UUID is properly formatted, and then inserts the expense into the Supabase database.
7. Retrieving Expenses from Supabase
To retrieve a list of expenses from the database, we implement a function that queries the expenses table:
@expense_agent.tool
async def retrive_from_database(ctx: RunContext[Dependencies]) -> str:
    """
    Retrieve all expenses for the current user from the database.
    """
    try:
        supabase: Client = ctx.deps.supabase_client
        user_uuid: str = ctx.deps.user_uuid

        response = (
            supabase
            .table("expenses")
            .select("*")
            .eq("user_uuid", user_uuid)
            .order("created_at", desc=True)  # or whichever order you prefer
            .execute()
        )

        return json.dumps(response.data, indent=2)
    except Exception as e:
        return f"Failed to add expenses to database. Error: {e}"
This function queries all the records from the expenses table and returns them as ExpenseBase objects.
8. Updating Expenses in Supabase
Finally, we’ll add a function to update an existing expense in the database:
@expense_agent.tool
async def update_from_database(ctx: RunContext[Dependencies], expense: ExpenseBase) -> str:
    """
    Update an expense in the database using the expense.uuid as the primary key.
    """
    try:
        supabase: Client = ctx.deps.supabase_client

        update_fields = {
            "title": expense.title,
            "date": expense.date.isoformat(),
            "description": expense.description,
            "category": expense.category.value,
            "amount": expense.amount
        }

        # Use expense.uuid to locate the record in DB (assuming "expense_id" is the PK)
        response = (
            supabase
            .table("expenses")
            .update(update_fields)
            .eq("expense_id", str(expense.uuid))
            .execute()
        )

        return f"Expense {expense.uuid} updated successfully. Result: {json.dumps(response.data, indent=2)}"

    except Exception as e:
        return f"Failed to add expenses to database. Error: {e}"
Other tools to help the model generate expenses
@expense_agent.tool
async def todays_date(ctx: RunContext[Dependencies]) -> str:
    return str(date.today())

@expense_agent.tool
async def generate_uuid(ctx: RunContext[Dependencies]) -> str:
    return str(uuid.uuid4())
Testing the Agent response
from IPython.display import Markdown, display

r = expense_agent.run_sync(
    'I did buy 10 candies each one of them with 15dh, 2 bottles of water for 5dh each, and a sandwich for 20dh.',
    deps=Dependencies(
        user_uuid='cdb64645-e1e4-4686-af86-de8f581b8037',
        supabase_client=None
    ),
    usage_limits=UsageLimits(request_limit=5),
)
print(f"Answer for User:\\n>>{r.data.answer_to_user}")
print(f"Tips for User:\\n>>{r.data.tips_to_user[1] if r.data.tips_to_user[0] else 'No tips'}")
print(f"Expense Recorded:\\n>>{r.data.expense}")
Output sample
Answer for User:
Your expenses have been recorded successfully. Here’s a summary of your recent expenses:
- Candies: 10 candies at 15dh each, total 150dh
- Bottles of water: 2 bottles at 5dh each, total 10dh
- Sandwich: 1 sandwich, total 20dh
Total spent on food: 180dh
Tips for User:
- Consider buying in bulk or looking for discounts to save on food expenses.
Expense Recorded:
[
	ExpenseBase(
		uuid=UUID('313af951-1c1f-493d-afd9-ab2cd0b0f0ae'),
		title='Candies', date=datetime.date(2025, 2, 24),
		description='10 candies at 15dh each',
		category=<ExpenseCategory.FOOD: 'food'>,
		amount=150.0
	),
	ExpenseBase(
		uuid=UUID('d3979bc8-cd47-4d5b-996a-adbdbe8aea62'),
		title='Bottles of water',
		date=datetime.date(2025, 2, 24),
		description='2 bottles of water at 5dh each',
		category=<ExpenseCategory.FOOD: 'food'>,
		amount=10.0
	),
	ExpenseBase(
		uuid=UUID('c4a86d69-ff74-4888-a335-471247f03b8f'),
		title='Sandwich',
		date=datetime.date(2025, 2, 24),
		description='1 sandwich',
		category=<ExpenseCategory.FOOD: 'food'>,
		amount=20.0
	)
]


The output above shows how the AI agent processes and responds to user queries about expenses. In this example, when a user mentions buying candies in a complex way, bottles of water and a sandwich the agent not only records the expenses but does the needed math and also provides personalized money-saving tips. This demonstrates the agent’s ability to combine expense tracking with intelligent financial advice.
Supabase Postgres Database

In Supabase dashboard, we can see that the expense_agent did add the expenses described by the user in the database.
9. Creating the Gradio Interface
We will use Gradio to create an interactive UI where users can input their expense details and interact with the AI agent. Here’s how you can set up the UI:
import gradio as gr

def run_expense_agent(user_input, *args, **kwargs):
    response = expense_agent.run_sync(
        user_input,
        deps=Dependencies(
            user_uuid='your-user-uuid',  # Replace with the actual user UUID
            supabase_client=supabase
        ),
        usage_limits=UsageLimits(request_limit=5),
    )
    return response.data.answer_to_user, response.data.tips_to_user[1] if response.data.tips_to_user[0] else 'No tips', response.data.expense

# Build the interface
with gr.Blocks(theme=gr.themes.Soft()) as demo:
    gr.Markdown("# Expense Management Assistant")
    gr.Markdown("Upload receipts or expenses and ask questions about your finances.")

    with gr.Row():
        with gr.Column(scale=3):
            chatbot = gr.Chatbot(height=500, elem_id="chatbot")

            with gr.Row():
                msg = gr.MultimodalTextbox(
                    placeholder="Upload receipts and ask questions...",
                    file_count="multiple",
                    file_types=["image", "pdf"]
                )
                submit_btn = gr.Button("Submit", variant="primary")

        with gr.Column(scale=1):
            with gr.Accordion("Tips", open=False):
                tips_output = gr.Textbox(label="Expense Tips")

            with gr.Accordion("Expense Details", open=False):
                expense_output = gr.JSON(label="Extracted Data")

            with gr.Accordion("Files", open=False):
                file_output = gr.Textbox(label="Processed Files")

    # Set up the chat functionality
    def respond(message, chat_history, files):
        if message == "":
            return "", chat_history, "", None, ""

        answer, tips, expense, file_info = run_expense_agent(message, files, chat_history)
        chat_history.append((message, answer))
        return "", chat_history, tips, expense, file_info

    submit_btn.click(
        respond,
        inputs=[msg, chatbot],
        outputs=[msg, chatbot, tips_output, expense_output, file_output]
    )
    msg.submit(
        respond,
        inputs=[msg, chatbot],
        outputs=[msg, chatbot, tips_output, expense_output, file_output]
    )

    gr.Markdown("### Need help? Try asking:")
    gr.Examples(
        [
            "What's my total expenses for this month?",
            "Categorize this receipt for me",
            "When was my last business expense?",
            "Show me all expenses over $100"
        ],
        inputs=msg
    )

demo.launch()
User interface after rendering
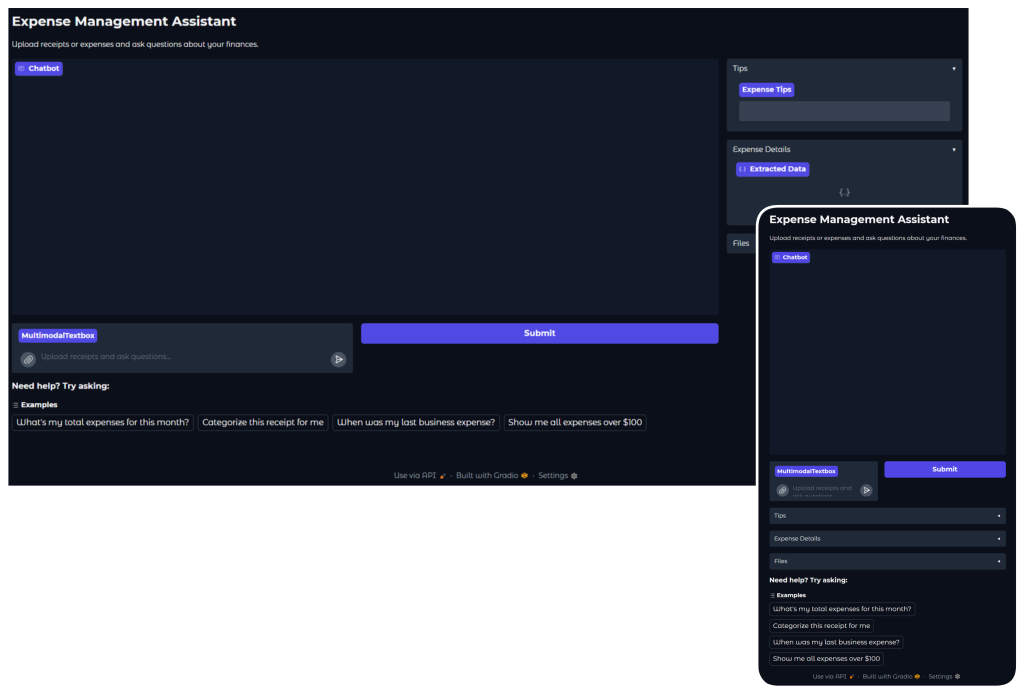
The user interface features a clean and intuitive design with a chat-like interaction model. Users can easily input their expenses through text or by uploading receipts, while the AI assistant provides real-time feedback and financial insights. The interface also includes dedicated sections for viewing expense tips and detailed transaction data.
10. Testing and Deploying
Conclusion
At hiberus, we are ready to help you implement AI in your organization. Our expertise in generative AI allows us to design personalized solutions that drive your business toward the future.
Contact us to discover how AI can revolutionize your business!
Contact with our Data & AI teamWant to learn more about Artificial Intelligence for your company?